
Welcome to the Network Engineering Domain
Pape O. Fall's Blog
Route Maps are characterized as one of the most powerful tool in Cisco IOS toolkit and the reason for it is because they can do a large number of things for us. If you are familiar with the “IF then ELSE” statements in Programming Language then understanding Route Maps will be a breeze for you. IF a certain condition is true, THEN perform a specific action.
Route Maps allows us to define a routing policy that’ll be inspected and applied before the router examines its forwarding table. Hence, giving us a great amount of leverage with the ability to manipulate first hand the routing decision before the route process kicks in. Some of the most common ways you can use route-maps are:
Policy Based Routing
Route Filtering
Prefix Tagging and Route Metric assignment
Route Control
We will use several examples to illustrate the functionality of route maps. We will start with a basic redistribution example…

At this point all segments have been configured with their respective prefixes. Both EIGRP and OSPF have been implemented. Let’s verify from R2 perspective…

Here is what we are going to do… We are going to redistribute EIGRP into OSPF and tag Loopback1 with a value of 11 and Loopback2 with a value of 22. We will also match everything else and tag it with a value of 99. Let’s do that ! First we need to match on our prefixes and we will use ACLs on R2 to do that…
![]()
Simple as that we just matched on the subnets of both loopback interfaces. Let’s now configure the Route Maps…

All right ! Note that Route Maps are executed starting with the lowest sequence number (In our case 10) and we can modify it to executive a specific statement first. Here, we called the ACL with the command “match ip address xx” then we set the action which is to tag any route matching the prefix defined in the ACL with a tag value. So basically if the matching criteria is true, then tag it with a value of xx. If there is no match, then move on to the next sequence and repeat the “IF then ELSE” scenario.
Note that on sequence 30, we did not match any prefixes which basically means “match all”. In that sense, all routes are tagged with a value of 99.
Let’s now redistribute the prefixes into OSPF…

Here, we’ve redistributed EIGRP into OSPF but we called the route-map EIGRP_2_OSPF. Let’s check the OSPF database of R1 and make sure our tagging is accurate…

This works ! Lo1 has been tagged with a value of 11 and Lo2 with a value of 22. Note how the egress interface participating in EIGRP falls under the matching criteria on sequence 30 which is “match all” and the tag value is 99.
It’s important to note that configuring an ACL or Prefix List or AS_Path List should be done first so the route map does not call an empty ACL or Prefix List or AS_Path List.
Let’s for instance take a look at the routing table of R1…
Let’s head to R2 and amend the Route Map configuration to set the metric type to something different for the 172.16.23.0/24 prefixes…

Here we used the command “set metric-type type-1” to set send the routes as Type 1 to our peer. Let’s check R1 routing table again…

Fantastic ! Let’s look at a different scenario…

We will use the same analogy but we will deny the advertisement of the 172.16.23.0/24 prefix. Let’s head to R2 and modify the Route Map…
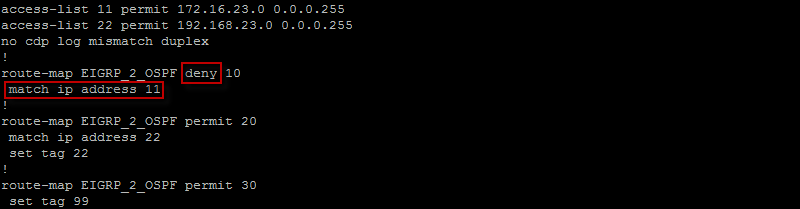
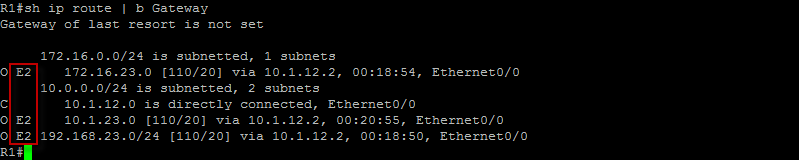
Here on sequence 10 we’ve basically used the “deny” statement to deny the matching criteria found true (in our case we are matching on ACL 11). Note that sequence 20 and 30 remains the same. At this point, we should NOT see the 172.16.23.0/24 prefix on R1 but let’s check R1 routing table…

Very Good ! It is not there ! Let me show you a different way of doing this. You may find this more effective than the above solution. Let’s head back to R2…

Here, we’ve only defined a single sequence. Note that at the end of every Route Map there is a “Implicit Deny”. At this point, both the egress interface as well as loopback 1 prefixes should be filtered. If we wanted the egress interface prefix to be propagated across then we would need to configure an ACL matching the prefix and tie it to a Route Map with a sequence number either higher or lower than the configured one. Let’s verify by checking R1 routing table again…

Good ! They are not here !
This is the basic of Route Maps which is essential in our troubleshooting toolkit. Note that there are tons of other options we can leverage when dealing with Route Maps such as set the local preference value with BGP or set a next-hop IP and so on…
Quick Tips: In a policy-routing environment, packets that do not meet the match criteria are forwarded according to the routing table
That completes this topic. Please let me know if you have any questions. Thank you for checking in !
 Hi, I'm Pape ! Folks call me Pop. I'm CCIE #48357. I love what I do and enjoy making tech easier to understand. I also love writing, so I’m sharing my blog with you
| M | T | W | T | F | S | S |
|---|---|---|---|---|---|---|
| 1 | 2 | 3 | 4 | 5 | ||
| 6 | 7 | 8 | 9 | 10 | 11 | 12 |
| 13 | 14 | 15 | 16 | 17 | 18 | 19 |
| 20 | 21 | 22 | 23 | 24 | 25 | 26 |
| 27 | 28 | 29 | 30 | |||
Nice post, the samples are simple and very easiest to hunderstand.
Thank you Sambe !
Awesome post !