
Welcome to the Network Engineering Domain
Pape O. Fall's Blog
Conventional network security often focuses more on ACLs blocking traffic either inbound or outbound but Cisco switches do have the capability to secure switchports for inbound traffic by pinpointing and limiting ingress packets based on source Ethernet Mac Addresses. This is huge as now we can control at an even more granular level who gets to connect to the network and specify an action if a violation occurs. Let me explain further…
The switch can learn the Mac Address of a device via 3 different ways:
-Dynamic: Learned during switch operation and not retained
-Static: Added manually into the configuration
-Sticky: Learned during switch operation and added automatically into the configuration
It is important to note that we have the ability to set a limit in terms of the number of Mac Addresses allowed in an interface. The Mac Addresses can also be specified either statically or dynamically.
Once the feature is enabled on an interface, it tracks the secure Mac Address(es). When a port’s maximum is reached and a new Mac Address is learned, then a violation occurs. A violation will also occur after a secure address learned on one port appears on a different secure port.
There are 3 actions that can take place when a violation occurs:
-Shutdown: This is the default mode and it automatically places the ports into “error-disabled” state, drops all traffic and send a SNMP trap notification
-Protect: This mode silently drops traffic that’s in violation until the number of addresses are within norm
-Restrict: This action is similar to “Protect” but it also increment the security violation counter for each violation and send a SNMP trap
It is also important to note that an age limit can be set for secured addresses on a port. This is extremely useful as it can assist in removing inactive addresses. There are 2 types of aging:
-Absolute: Secured addresses are removed after a specified timeframe
-Inactivity: Secured addressed are removed when inactive for the specified timeframe
Let’s hop onto the console here and see the above in action…

Typically, the only command needed to enable the feature is “switchport port-security”. Of course there are additional commands we can leverage to actually tweak the feature to operate a certain way which we will see in a second.
But I wanted to draw your attention to this error message above. Note that the switch won’t accept the command as long as the port is in dynamic mode. Let’s configure the port as an access port and try again…
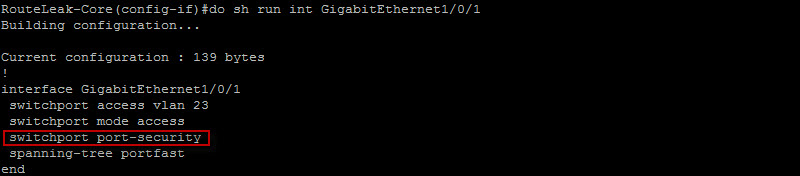
Fantastic ! The command is now accepted. Let’s take a look at the default port-security settings on Gig1/0/1…

Here, notice how the default violation is “shutdown” and the maximum Mac Addresses is actually 1. Also notice how the switch has not learned any Mac Address at this point. Let’s connect a host on Gig1/0/1 and run the same command to see what Mac Address the switch learns…
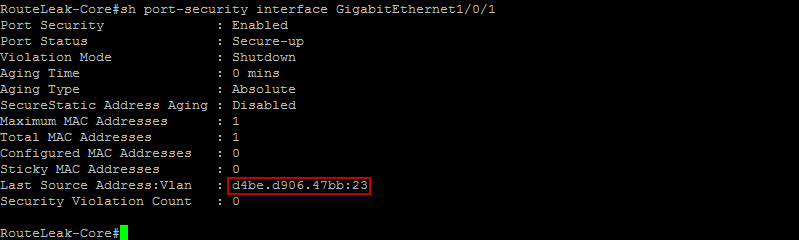
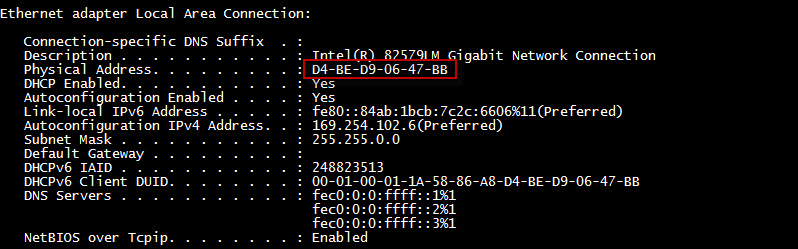
Good ! Let’s take a road trip to our host and make sure it is the same Mac Address…
Very good ! Let’s now tweak these around a bit. Let’s configure a dummy static secure Mac Address on Gig1/0/2 and connect our computer on that switchport…

Notice here how we configured our dummy Mac Address which caused a Security violation. Now, the default violation mode is “shutdown”. Let’s take a look at the interface state…
![]()
Notice here how the interface is in “err-disabled” state which is what we expected. Note that in order to restore functionality on the port. we will need to shut it, correct the configuration and unshut it. Let’s remove the dummy Mac and tweak the configuration around a bit…

Here, we have set the maximum Mac Addresses to be 2 and the aging time to be 1 hour. Notice how the aging type is “inactivity” here and the action to be performed when a violation occurs is “protect”.
Now let’s say we have a switchport forwarding both access and voice traffic; We can certainly tailored our port-security configuration to be specific to the port settings. Let’s see that in action…
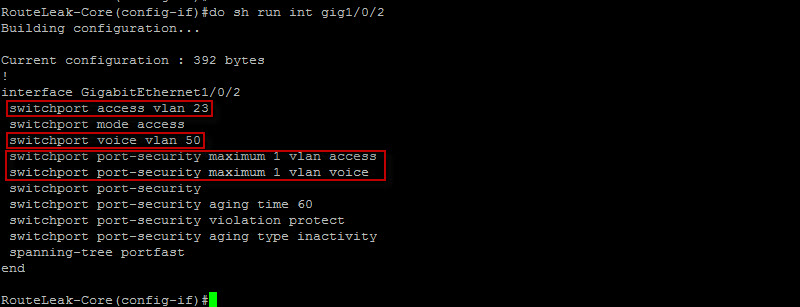
Here, you can see how the configuration can be specific to either “access” or “voice”.
It is also important to note that we also have the ability to auto recover an “error disabled” port by configuring the following…
![]()
Here, we’ve instructed the device to auto-recover the port if it is disabled by the “port-security” feature in 300sec which is 5mns.
That should do it for this topic. Please let me know if you have any questions.
 Hello I'm Pape. My friends call me Pop. I'm CCIE #48357. I enjoy my field and love to share it with others. I love to write so I'm sharing my blog with you.
| M | T | W | T | F | S | S |
|---|---|---|---|---|---|---|
| 1 | ||||||
| 2 | 3 | 4 | 5 | 6 | 7 | 8 |
| 9 | 10 | 11 | 12 | 13 | 14 | 15 |
| 16 | 17 | 18 | 19 | 20 | 21 | 22 |
| 23 | 24 | 25 | 26 | 27 | 28 | 29 |
| 30 | ||||||
Leave a Reply