
Welcome to the Network Engineering Domain
Pape O. Fall's Blog
In this post, we will talk about Trunk Links and the purpose to implement them in your environment.
We will be using the following topology…

First, let’s talk about the meaning Trunk Link and its purpose. In layman’s terms, a trunk link is nothing but a regular link with the ability to pass and segregate multiple vlans. In today’s era, IEEE 802.1Q tagging protocol is the most common trunking method used to connect multiple vlans across a trunk link. The protocol is standard and supported by many vendors.
However, there is another trunking protocol called “ISL” which is Cisco Proprietary. Hence, not supported on Dell switches for instance.
Let’s dive in and get some hands on. Let’s connect to RouteLeak-SW01/RouteLeak-SW02 and configure the vlans…
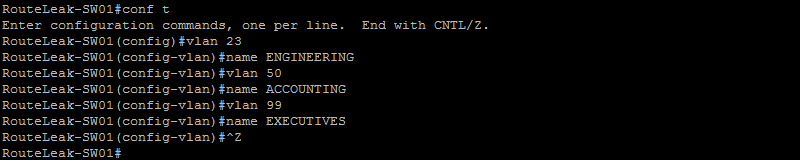
Let’s check to make sure our vlans are successfully installed in the vlan database…

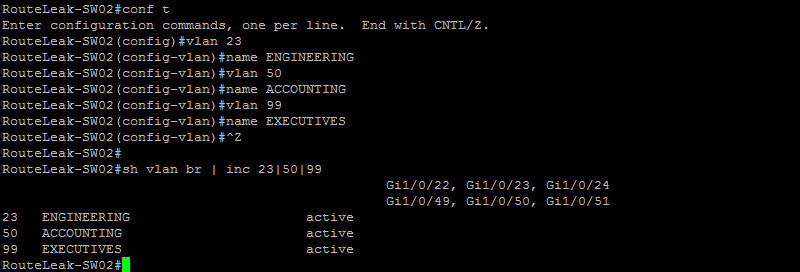
Ok, looks like we are good here. Let’s do the same with RouteLeak-SW02…
We have all the vlans configured. Our next step is to configure the trunk link using IEEE 802.1Q tagging protocol. Let me show you what a 802.1Q tag looks like…
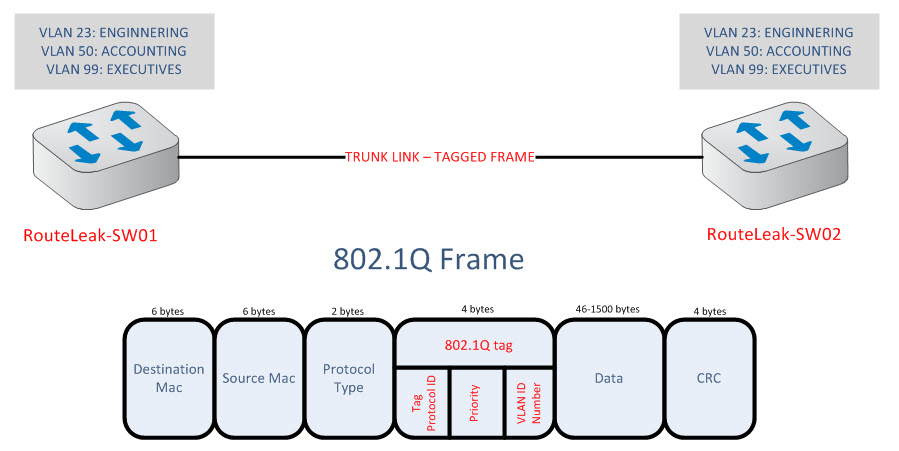
As you can see here, it is basically an Ethernet frame with the addition of a 4 bytes field referencing “802.1Q” tag. If you look closely, you can see the VLAN identifier field which is leveraged to identify what vlan the frame belongs to. You can also see a priority field which is typically used to prioritize traffic. This is mainly used with QoS in order to determine what packets need to be forwarded first and which ones need to be queued up.
So here is what happens when a computer connected to vlan 23 sends a packet across:
*The client sends an untagged frame to the switch
*The switch receives the frame and know it came from a client in vlan 23, so it adds a Vlan Tag to the frame (VLAN23) and transmit the packet across the Trunk
*The peer switch receives the frame and check the tag
*The peer switch determines that the frame belongs to VLAN23
*The peer switch then strips the vlan tag out of the 802.1Q frame and only transmits an Ethernet frame to the client on vlan 23 (Destination Address)
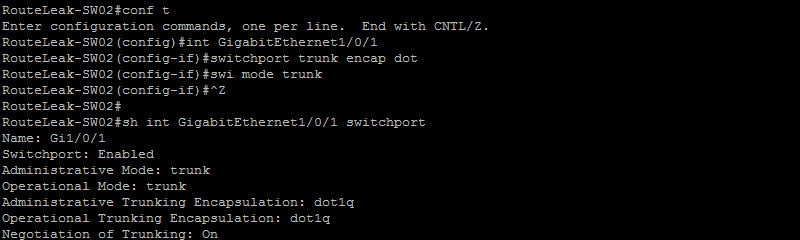
Ok, let’s now configure our trunk link. Let’s connect to RouteLeak-SW01 and configure Gig 1/0/1 in trunk mode…

Ahh ! You can see here an error message generated by the switch complaining about the encapsulation type. This is not valid for all Catalyst switches but in some instances, you will need to set up the encapsulation type prior to setting the interface to trunk mode. In my case, I’m using a WS-C3750G-48PS. Let’s configure the encapsulation type to 802.1Q and set the interface to trunk mode…

Ahh ! That’s better. You can see here that after see setting the encapsulation type, I was able to place the interface in trunk mode. I also wanted to show you the different options you have in terms of the encapsulation type. We’ve discussed ISL briefly in the beginning but let’s talk about the “negotiate” option a bit.
For integrated IOS switches, the default encapsulation is always “negotiate”. It leverages a signaling method between the trunk ports to dynamically agree on a encapsulation method. ISL is prefered over 802.1Q. So if you would like to set your encapsulation method to 802.1Q, it is recommended to statically configure it on each end.
Ok good, now let’s check RouteLeak-SW01 to see if the trunk is configured correctly…

Let’s do the same with RouteLeak-SW02…
All right, looks like we are solid here. Let’s check our vlans one more time and make sure they are there. I also wanted to bring your attention to one thing here…
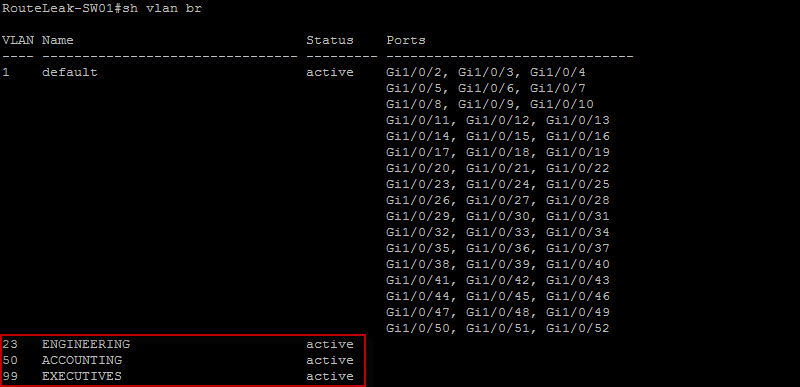
Our Vlans are still there but where is Gig1/0/1. It does not appear to be assigned anywhere !
Well that’s simply because the “sh vlan” command only displays interfaces in access mode and Gig1/0/1 is in Trunk mode.
Another useful command is “Sh int trunk”. Let’s do that and see what we get…
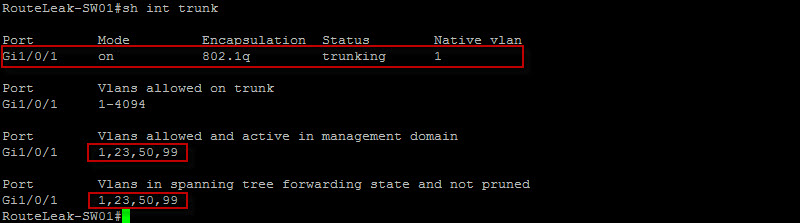
Here we can see useful information. We can clearly see here that interface Gig1/0/1 is in fact in trunk mode and the encapsulation type is 802.1q. We can also see that the native vlan is 1 (Default) but note that for security purposes, it is good practice to change the native vlan to something else (Say vlan 555 for instance). The output also shows us the Vlans allowed on the trunk links, the ones in forwarding state (STP) and the ones active in management domain. So, let’s dig deeper and set our native vlan to be 555 and let’s block vlan 99 (EXECUTIVES) in the trunk link…
Okay – Quick Tips: Since Vlan 99 is for the Executive users, You might not want to block them but let’s just do it for the sake of this section…
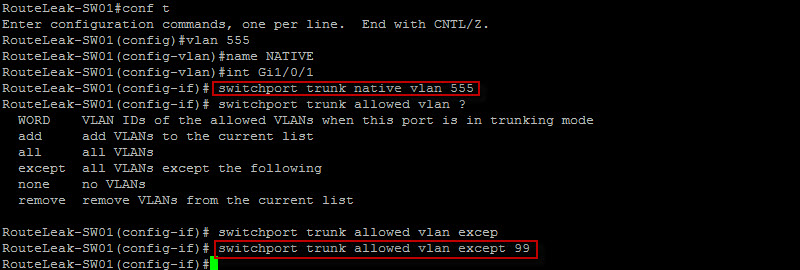
So we did create a new vlan 555 and set it as “Native”. We also looked into our option and used the “switchport trunk allowed vlan except 99” since we wanted to block vlan 99. Let’s see what we have in the output of “sh int trunk”…
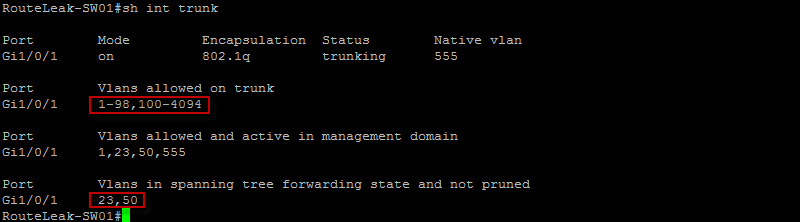
We’ve successfully blocked vlan 99. But let’s analyze what we have here. We know our goal was to block vlan 99 and in the process we made a mess. Can you spot it ?
Okay, if we look at the output of “Vlans allowed on trunk”, we can clearly see that we are allowing ALL Vlans except 99. But we only needed to allow vlan 23 and vlan 50. In terms of Security, this is a NO NO ! Let’s fix that…
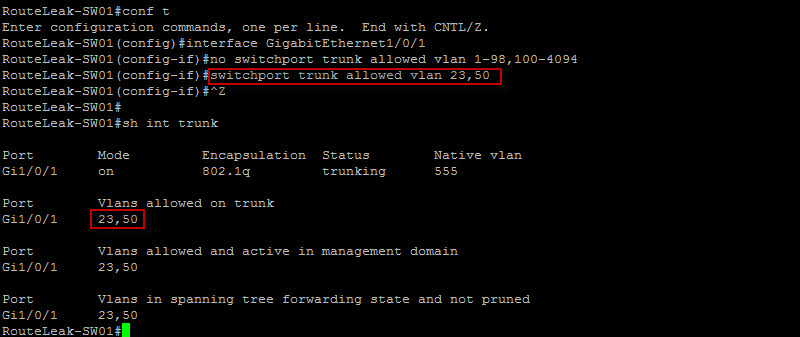
We are good. We can clearly see that we are only allowing Vlan 23 and Vlan 50. The configuration needs to be identical on both sides so we will need to configure RouteLeak-SW02. Let’s do that…
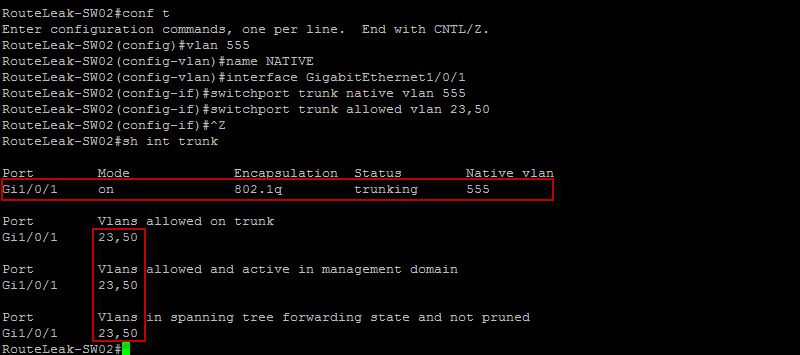
Quick Tips: If both side of your trunk link do not basically agree on a specific Native VLAN, your trunk link would not operate properly. You will get a “Native Vlan Mismatch” error. It is good practice to make sure your configuration on side B mimics the configuration on side A.
All right, we are now good to go !
We should be good for today… I’ll talk to you guys later.
 Hello I'm Pape. My friends call me Pop. I'm CCIE #48357. I enjoy my field and love to share it with others. I love to write so I'm sharing my blog with you.
| M | T | W | T | F | S | S |
|---|---|---|---|---|---|---|
| 1 | ||||||
| 2 | 3 | 4 | 5 | 6 | 7 | 8 |
| 9 | 10 | 11 | 12 | 13 | 14 | 15 |
| 16 | 17 | 18 | 19 | 20 | 21 | 22 |
| 23 | 24 | 25 | 26 | 27 | 28 | 29 |
| 30 | ||||||
yes I really like your explanation its very helpful and I learn more stuff here also other than my ccna class .thanks papi good continuation..
I’m glad you benefited from it Alpha. Regards !