
Welcome to the Network Engineering Domain
Pape O. Fall's Blog
Let’s illustrate how to configure Dynamic NAT. At this point, if you are unfamiliar with NAT then please read this post here first.
We will use the following topology to make our point…
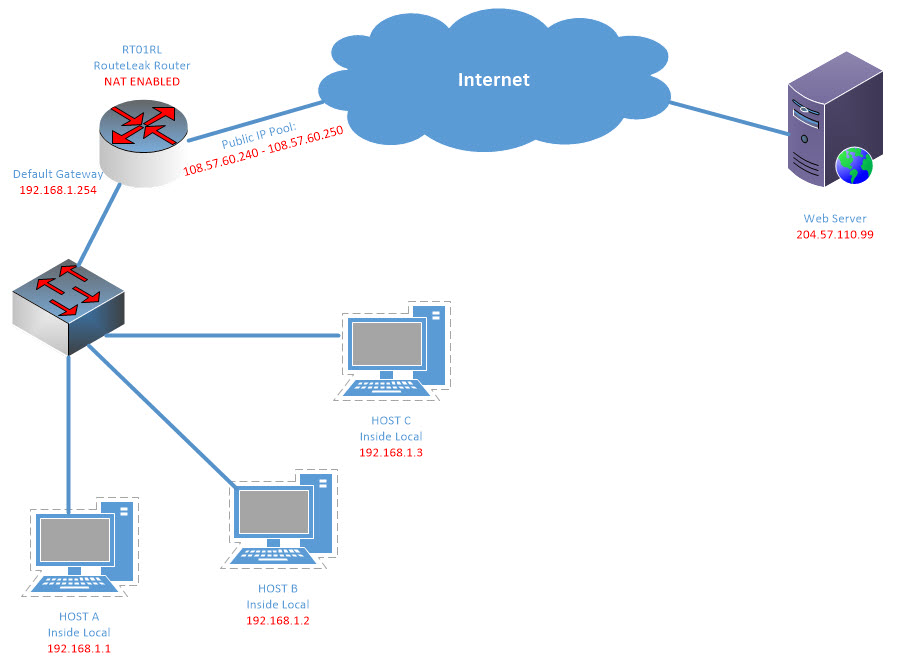
This topology above consists of a number of hosts (Host A, Host B, and Host C). The Service Provider has allocated a pool of 254 usable public IP addresses to our company but we only would lke to use 11 of them (108.57.60.240 through 108.57.60.250). Our goal here is to instruct RT01RL to dynamically allocate the public IP addresses to the internal network.
As configuring static NAT, we need to identify the direction of the NAT rule which would tell us where to set our inside and outside boundaries.
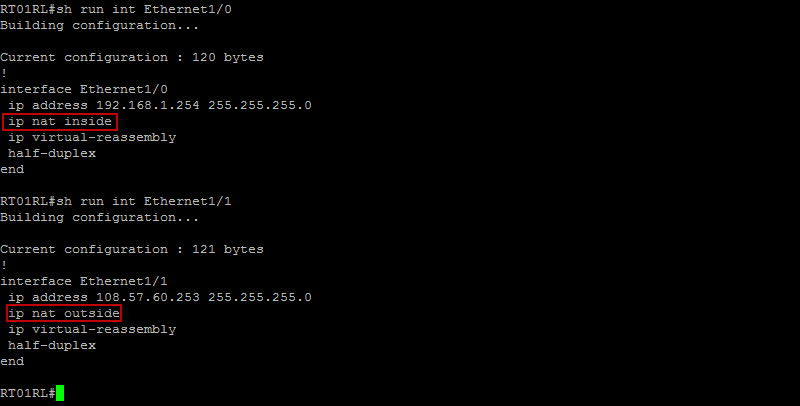
Let’s look at the interfaces of the router first…

Based on our target goal which is to NAT internal hosts to Outside hosts on our topology, it is clear here that Eth1/0 should be the inside interface and Eth1/1 should be the outside interface. The direction of the NAT is from the Inside to the Outside.
Let’s configure that…
Excellent ! Our next step is to define the pool of usable public IP addresses on the router. This, along with the upcoming NAT command will instruct the router to dynamically pull form the IP pool with regards to remapping internal host IP addresses so they can be properly routed out to the internet. The NAT entry will remain on the NAT table for the length of the session.If you are in the market for superclone Replica Rolex , Super Clone Rolex is the place to go! The largest collection of fake Rolex watches online!
Let’s do that…

The command entered above is: ip nat pool RouteLeak_Pool 108.57.60.240 108.57.60.250 prefix-length 24
Here as you can see, we’ve defined a pool which we will need to use to make a call to the pool list in the next few steps. We’ve specified the starting pool address as well as the end. It is also mandatory to either specify the prefix length or the subnet mask.
Our next step now is to configure access-list(s) to match on our internal hosts. Let’s do that…
![]()
This access-list is imperative as it will be applied to the NAT rule effectively specifying which internal hosts need to be translated. We’ve then matched on all hosts on 192.168.1.0/24 for the sake of scalability.
Let’s now configure our NAT rule and tie the ACL to the Public IP pool list…
![]()
Fairly straight forward, right ? Here, we are saying tie all hosts defined in ACL 100 to the public IP pool RouteLeak_Pool.
That’s all there is to it. Let’s check the NAT translation table before we send a request out to the internet.

As you can see here the table is empty. This is also an indication that we are using dynamic NAT. If we were to statically NAT specific hosts to specific Pub IPs, the entries in the NAT table would have been permanent. Let’s generate traffic here and see what we get…

Ok good ! Let’s now make a road trip to RT01RL and check our NAT table…

Here you can see that each internal host has been assigned with a Public IP address. The protocol here is defined as ICMP because we sent ping requests and the ports (4 and 3) are source and destination ports. If we were to send a HTTP requests for instance, the source ports would have been arbitrary and the destination ports would have been either 80 or 443 depending on the protocol type embedded in the tcp header.
Let’s actually see that live.
-From Host A, we will generate HTTPS traffic
-From Host B, we will generate SSH traffic
-From Host C, we will generate DNS request
Let’s enable http server on Web_Server…

Good ! Let’s hop on our hosts and configure IP SLA traffic generator and then check our NAT table.
-Host A will be configured with the following commands:
ip sla monitor 1
type tcpConnect dest-ipaddr 204.57.110.99 dest-port 443 control disable
timeout 1000
frequency 3
ip sla monitor schedule 1 life forever start-time now
-Host B will be configured with the following commands:
ip sla monitor 1
type tcpConnect dest-ipaddr 204.57.110.99 dest-port 22 control disable
timeout 1000
frequency 3
ip sla monitor schedule 1 life forever start-time now
-Host C will be configured with the following commands:
ip sla monitor 1
type dns target-addr www.routeleak.com name-server 204.57.110.99
timeout 0
frequency 9
ip sla monitor schedule 1 start-time now life forever
Let’s now check the router NAT table…
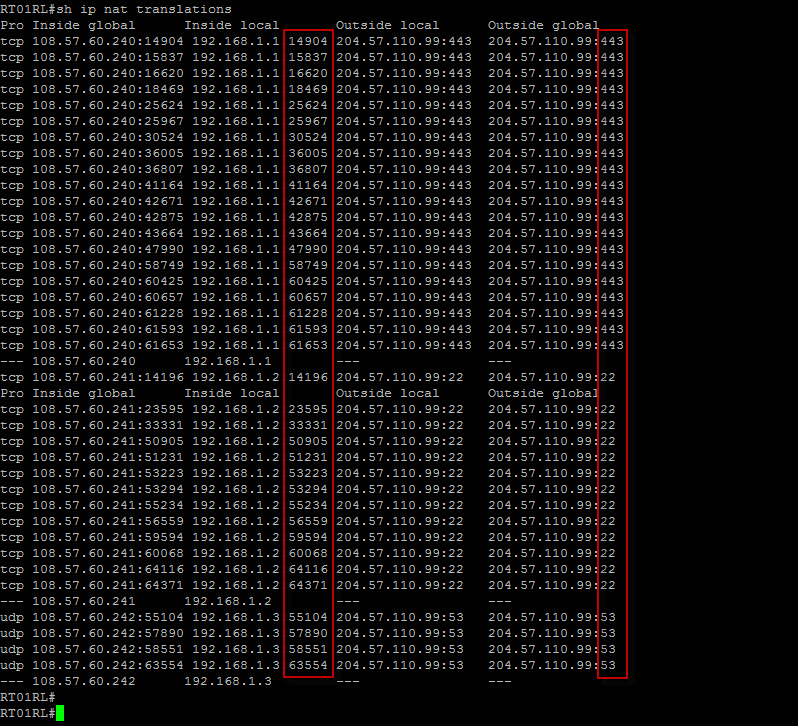
As you can see here, the source ports are arbitrary and the destination ports matches the traffic protocol. Here, we have both TCP and UDP traffic passing through the router and each session type points to a unique public IP address.
That’s all I wanted to show you today. Please let me know if you have any questions.
 Hi, I'm Pape ! Folks call me Pop. I'm CCIE #48357. I love what I do and enjoy making tech easier to understand. I also love writing, so I’m sharing my blog with you
| M | T | W | T | F | S | S |
|---|---|---|---|---|---|---|
| 1 | ||||||
| 2 | 3 | 4 | 5 | 6 | 7 | 8 |
| 9 | 10 | 11 | 12 | 13 | 14 | 15 |
| 16 | 17 | 18 | 19 | 20 | 21 | 22 |
| 23 | 24 | 25 | 26 | 27 | 28 | 29 |
| 30 | 31 | |||||
Leave a Reply