Cisco Meraki is a highly recognized name in the networking industry and has been a subsidiary of Cisco Systems since its acquisition in 2012. Over the years, Meraki has become a leader in cloud-managed networking solutions, offering a broad range of products that deliver simplicity, scalability, and powerful management features. While there are many cloud-based Wi-Fi and network management options available today, Meraki stands out due to its wide portfolio of cloud-managed products that cater to businesses of all sizes—from small startups to large enterprises.

What makes Meraki particularly appealing is its ability to centralize and simplify network management through an intuitive cloud dashboard. Whether you’re deploying switches, wireless access points, security appliances, or cameras, Meraki’s unified management platform ensures a streamlined setup and easy ongoing maintenance.
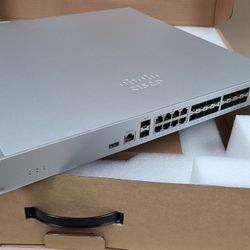
Today, we’ll focus on the initial setup of the Meraki MX64 security appliance, one of their widely used devices for network security and connectivity. While many Meraki products share similar installation steps, the process for getting your MX250 up and running is straightforward. This guide will walk you through unboxing, connecting the device, and configuring it in the Meraki dashboard, ensuring your security appliance is online and protecting your network in no time.

Unboxing the Meraki MX
Begin by carefully opening the packaging. Inside, you’ll find the Meraki MX appliance, a power adapter, mounting hardware, and an ethernet cable. Double-check that all components are included according to the product manual.
Physical Setup
Place the Meraki MX appliance in your desired location, ensuring it’s near a power outlet and within reach of your network cables. If necessary, use the provided mounting hardware to secure the device in a rack or on a wall
Package Contents
In addition to the MX250, the following are provided:

MX250 Front Panel

MX250 Back Panel

Ports and Status Indicators
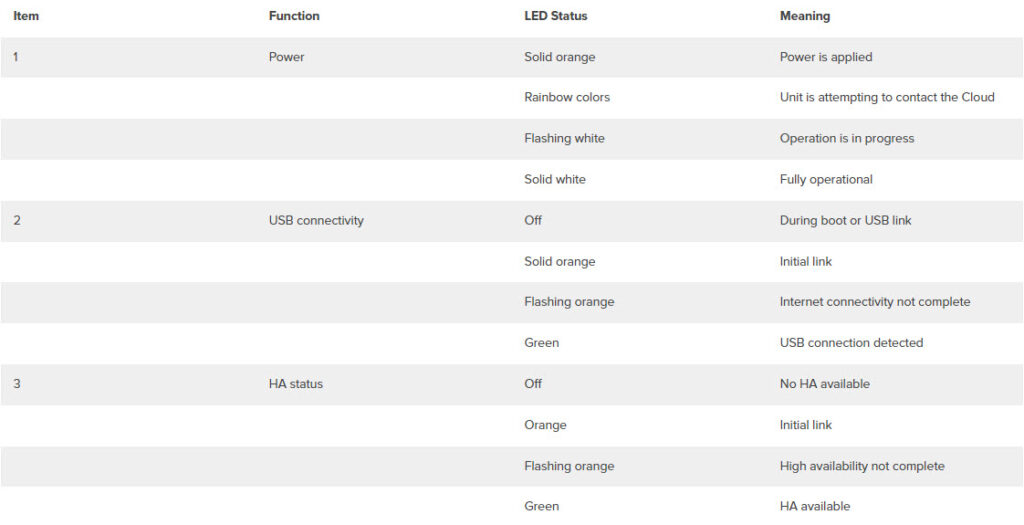
The MX250 utilizes LED indicators to convey the device’s status to the user. Upon powering up, all Internet LEDs will blink twice to signal startup. The specific functions of each LED are detailed below, listed from left to right.

How to reset the MX250
If a reset is needed, use a paper clip to press the reset button.
Connect the Power
Plug the power adapter into the Meraki MX, and connect it to a power outlet. Once connected, the device will power on automatically.
Connect the WAN circuit to the Meraki MX WAN port
Every Meraki MX device requires an IP address for operation. This section explains how to configure your local area network (LAN) before deploying the device. The appliance hosts a local management web interface, which can be accessed via a browser on a client PC. This interface allows you to configure and monitor basic ISP/WAN connectivity settings.
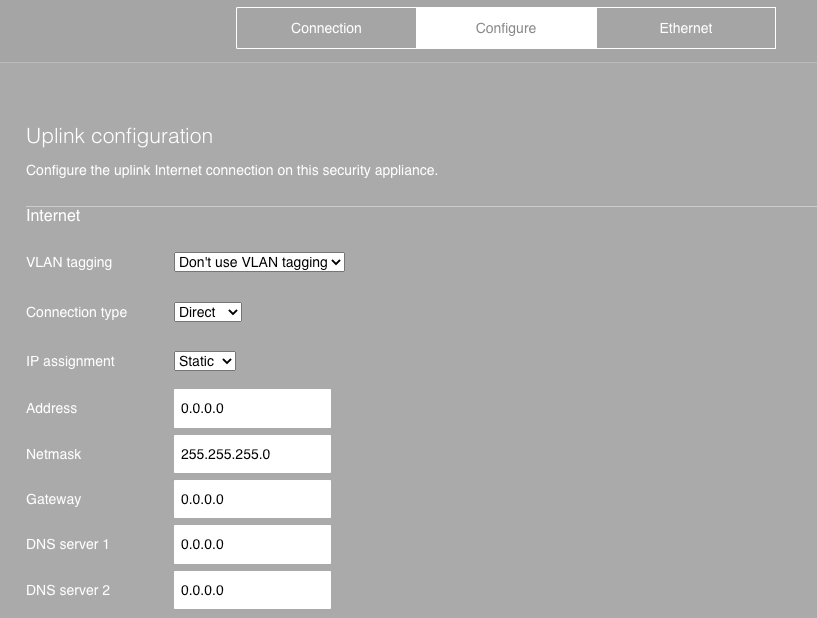
Setting up a Static IP Address
Follow these steps to configure basic connectivity and other network parameters:

Setting up a DHCP IP Address
By default, all MX devices are set to obtain an IP address via DHCP from the upstream WAN or ISP servers. To establish connectivity, simply connect the MX’s WAN/Internet port to your upstream network and wait a few minutes for the device to acquire a DHCP address.
LAN Configuration
Connect a computer or switch to one of the LAN ports on the Meraki MX for internal network connectivity. This will allow you to configure the device through the local network
Claim Your Device in the Meraki Dashboard
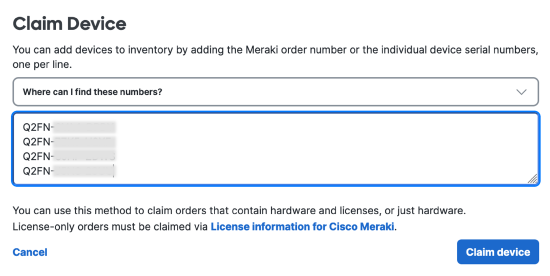
Log into your Meraki Dashboard account. If you don’t have an account, you’ll need to create one. Once logged in, navigate to “Organization > Inventory” and claim your Meraki MX by entering its serial number found on the back of the device

Assign the MX to a Network
After claiming the device, assign it to an existing network or create a new one in the Meraki Dashboard. This step will allow the appliance to fetch its configuration and security policies

Firmware Update
The Meraki MX may automatically download and install any pending firmware updates. Ensure the device stays powered on and connected to the internet during this process

Basic Configuration
In the Meraki Dashboard, configure essential settings like IP addressing, firewall rules, and traffic shaping. Customize the security appliance to suit your network needs
Test the Setup
Once configured, test the Meraki MX by connecting devices to the network and ensuring they can access the internet. Confirm that firewall rules and security features are functioning as intended.
Your Meraki MX Security Appliance is now ready to protect and manage your network!
| M | T | W | T | F | S | S |
|---|---|---|---|---|---|---|
| 1 | ||||||
| 2 | 3 | 4 | 5 | 6 | 7 | 8 |
| 9 | 10 | 11 | 12 | 13 | 14 | 15 |
| 16 | 17 | 18 | 19 | 20 | 21 | 22 |
| 23 | 24 | 25 | 26 | 27 | 28 | 29 |
| 30 | ||||||